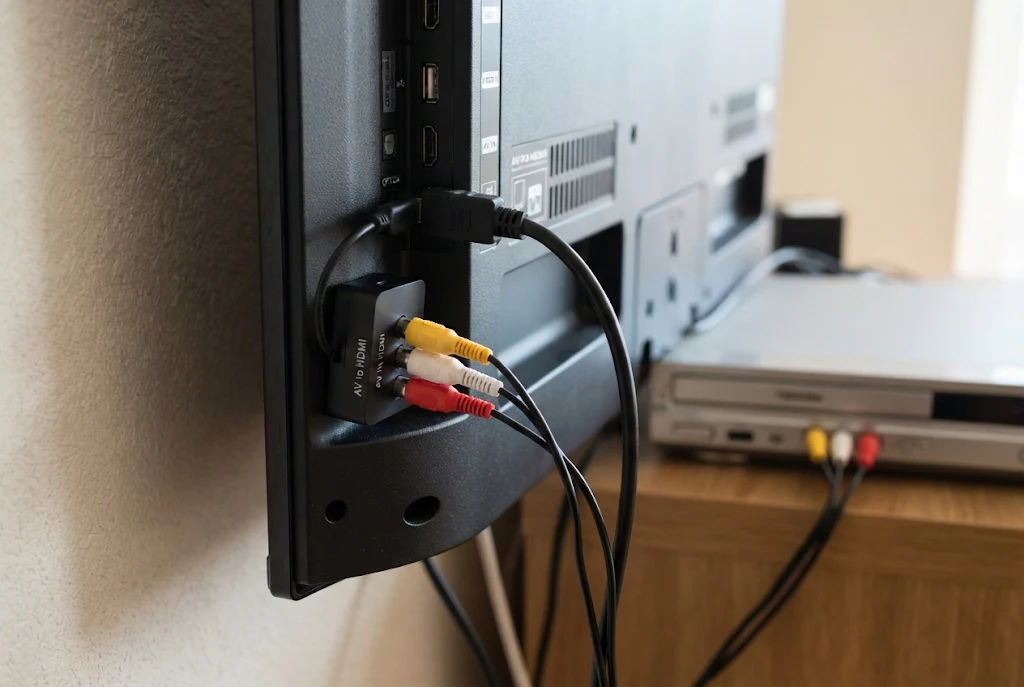
Got an old DVD player, VCR or games console and a new TV with nothing but HDMI sockets on the back? An AV cable HDMI converter fixes that. Here’s the short version: plug the red, white and yellow plugs from your old device into the matching sockets on the converter, connect an HDMI lead from the converter to your TV, power the converter through its USB cable, then switch the TV to that HDMI input.
That’s the whole job in four steps. Most problems people hit come from skipping one of them, usually the power. The rest of this guide covers each step properly, what to do if your old kit has a SCART socket instead of phono plugs (very common in UK homes), and how to fix the usual issues: no signal, no colour and no sound.
What an AV Cable HDMI Converter Actually Does
Older devices send out an analogue picture, usually called composite video or AV. Your new TV only understands a digital HDMI signal. The converter sits in the middle, reads the analogue signal and turns it into HDMI.
That’s why a plain “RCA to HDMI cable” with no box in the middle won’t work. Analogue and digital signals aren’t compatible, so something has to do the conversion, and that needs a small chip and a bit of power. If you bought a lead with phono plugs on one end and an HDMI plug on the other and nothing in between, it isn’t faulty. It just can’t do the job.
A few terms you’ll see on the box:
- AV, composite, CVBS or RCA: all refer to the same yellow video plug, usually paired with red and white audio plugs. Composite video is an analogue format that carries the whole picture down one wire.
- Phono: the common UK name for RCA plugs.
- Upscaler: a converter that also stretches the picture to 720p or 1080p so it fills a modern screen.
What You Need Before You Start
Check you’ve got everything before you pull the TV away from the wall:
- The converter box. A typical one is about the size of a matchbox, with three phono sockets on one side and an HDMI socket on the other.
- An HDMI cable. Many cheap converters don’t include one, so check the box contents.
- A composite AV lead (red, white and yellow). Your old device may already have one plugged in.
- A power source for the converter. That means the supplied USB cable plus either a spare USB port on the TV or a USB wall plug.
- A SCART to phono adapter, but only if your old device has a SCART socket and no phono sockets. More on that below.
Check Which Socket Your Old Device Has
This is where UK readers often get stuck. Many older VCRs, Freeview boxes, Sky boxes and DVD players sold in Britain have a wide 21-pin socket called SCART rather than separate phono sockets.
SCART was the standard European connector for TVs and video gear for decades, so if your device is from the 1990s or 2000s there’s a good chance it uses it.
| What you see on the back of your device | What to do |
|---|---|
| Yellow, red and white round sockets | Use a standard composite AV lead straight into the converter |
| Only a wide SCART socket | Add a SCART to phono adapter, then plug the AV lead into that |
| Yellow phono plus an S-Video socket | Use composite, or S-Video if your converter has an S-Video input |
| A games console with its own proprietary plug | Use the console’s original AV lead (it ends in red, white and yellow plugs) |
Setting the SCART adapter switch
Most SCART to phono adapters have a small switch marked IN and OUT. Set it to OUT, because the signal is coming out of your old device and heading to the converter. If it’s set to IN you’ll get a black screen, and it’s easy to blame the converter for it.
Step-by-Step: Connecting the Converter to Your TV
Do it in this order. Connecting power last makes it easier to spot where a problem starts.
Step 1: Connect the old device to the converter
Push the yellow plug into the yellow socket marked “Video” or “CVBS”. Then put the white plug into the left audio socket and the red into the right. The colours match the sockets, so you can’t really get this wrong unless a plug is loose.
If your device only has mono sound and a single white lead, plug that into the white socket. You’ll get audio from one channel or both, depending on the converter.
Step 2: Connect the converter to the TV
Run an HDMI cable from the converter’s HDMI socket to any free HDMI input on your TV. Make a note of the number printed next to the socket, for example HDMI 2.
Step 3: Power the converter
This step gets missed more than any other. The converter has no battery and can’t draw power through the phono leads, so it won’t do anything until the USB cable is plugged in.
You can use a USB port on the TV, but some TVs give those ports only a little power, or cut it when the TV is on standby. If the picture flickers or drops out, use a USB phone charger plug instead. A standard 5V wall plug is the most reliable option.
Step 4: Choose the right input on the TV
Turn on the TV and press the Source or Input button on the remote. Select the HDMI input you used in Step 2. With the converter powered but the old device switched off, many models show a blue screen with “No Signal” text. That blue screen is good news: it means the converter and the TV are talking to each other.
Step 5: Switch on the old device and press play
Turn on the DVD player, VCR or console and start something playing. The picture should appear within a few seconds.
Using the 720p/1080p Switch
Many converters have a small slide switch for 720p and 1080p output. Start with 1080p, as most TVs from the last decade handle it fine. If you get no picture at all, slide it to 720p and wait a few seconds. Some older HD-ready sets and a few monitors are fussy about the signal they accept.
Don’t expect 1080p to look like Blu-ray. Your original source is standard definition, and the converter is only stretching that picture to fit. In the UK that source picture is 576 lines, which is a long way short of 1080.
Troubleshooting: The Problems People Actually Hit
Here are the fixes for the most common issues, roughly in order of how often they come up.
| Problem | Most likely cause | What to try |
|---|---|---|
| TV says “No Signal” (TV’s own message) | Converter isn’t powered, or wrong HDMI input | Check the USB power, try a wall plug, then select the correct HDMI input |
| Blue “No Signal” screen from the converter | Old device isn’t sending video | Check the yellow plug, set the SCART adapter to OUT, make sure the device is playing |
| Picture is black and white | Colour system mismatch (PAL vs NTSC) | Check the source’s video output setting, or the converter’s switch if it has one |
| Picture but no sound | Audio plugs loose or swapped, or the TV’s audio output is set wrongly | Reseat the red and white plugs, check TV volume and sound output settings |
| Picture flickers or drops out | Not enough power | Swap the TV’s USB port for a 5V wall plug |
| Picture is squashed or stretched | Aspect ratio setting | Change the picture size setting on the TV, for example to 4:3 or “Original” |
| Fuzzy or soft image | Normal for composite video | Use S-Video or RGB SCART with a better converter if quality matters |
Why you might get a black and white picture
UK equipment uses the PAL colour system, while American and Japanese equipment generally uses NTSC. Most AV to HDMI converters detect the incoming format automatically. If yours doesn’t, or the source is an imported console or a DVD player set to output NTSC, you can get a clear picture with no colour at all.
Check the old device’s setup menu for a “TV system” or “Video output” option and set it to PAL or Auto. If the converter has a PAL/NTSC switch, try both positions.
When nothing works at all
Swap out one part at a time. Try a different HDMI cable, a different HDMI input on the TV, and a different AV lead. Cheap converters do sometimes arrive faulty, and if you’ve checked power, input and cables and still see nothing, a return is the sensible next step.
Is It Any Good for Retro Gaming?
For casual play it’s fine. You’ll see your old console on a big screen and the setup costs very little.
There are two catches. First, a cheap converter adds a little processing delay, and many modern TVs add their own. Switch your TV to Game Mode, which usually cuts the delay it adds. Second, composite video was never sharp, and blowing it up on a 55-inch screen shows every flaw.
If you’re a keen retro gamer, consoles like the PlayStation 2, GameCube and many older Nintendo and Sega machines can output better signals than composite. UK consoles from that era often support RGB over SCART. A dedicated SCART or RGB to HDMI upscaler costs more, but the improvement is easy to see.
Tips Most Guides Leave Out
- Label the input. Most smart TVs let you rename an HDMI input, so call it “VCR” or “PS2” so other people in the house can find it.
- Keep the box out of sight but not buried. These little converters get warm. Don’t wedge one behind a hot set-top box or under a pile of cables.
- Check direction before you buy. An AV to HDMI converter only works one way. If you want to connect a new HDMI device, such as a Fire TV Stick, to an old TV, you need the opposite product: an HDMI to AV converter.
- Leave the old device’s settings alone first. Get a picture working with default settings, then adjust things like aspect ratio. Changing several things at once makes problems harder to trace.
- Watching old tapes is not the same as saving them. The converter shows video on a TV but doesn’t record anything. To digitise VHS tapes, you’ll need a USB video capture device and a computer.
Final Thoughts
Connecting an AV cable HDMI converter takes about five minutes once you know the order: AV leads into the converter, HDMI out to the TV, USB power, then select the right input. Most problems trace back to power, a SCART adapter switch on the wrong setting, or a PAL/NTSC mismatch, and all three are quick to fix. Keep your expectations realistic on picture sharpness and you’ll get years more use out of kit you might otherwise have thrown out.
Frequently Asked Questions
Do I need to install any drivers or software?
No. These converters are plug-and-play. The TV sees the converter as an ordinary HDMI source.
Can I power the converter from my TV’s USB port?
Usually, yes. If the picture drops out or the converter only works while the TV is fully on, use a 5V USB wall plug instead.
Will an AV to HDMI converter work with a SCART device?
Yes, with a SCART to phono adapter set to OUT. Bear in mind a basic converter only takes the composite signal, so you won’t get the better RGB picture SCART can carry.
Why does my picture have black bars at the sides?
Older content is often 4:3, while modern TVs are 16:9. The bars keep the picture in its original shape. You can stretch it in the TV’s picture size settings, though people and objects will look wider.
Does the converter work with a Freeview or Sky box?
Generally, yes, as long as the box has composite or SCART output. That said, a newer HDMI box may give a far better picture for the same channels.